Copyright © Film School Online! |
A sample lesson from our Sound Course...
MICING TECHNIQUES
The first step in micing a set is to block the action. This involves working out actor and camera movement with the director and cinematographer. This process will help you make decisions about which microphone to use and where to position it.
The key to optimal microphone performance is in the placement of the microphone in relation to the sound source. If a microphone is too close, too far, or off axis, complications will result, including poor frequency response, noise, and distortion.
There are three basic mic placements from which all mic setups are built: boom, plant, and lavaliere. This priority is sometimes referred to as the Hierarchy of Microphone Techniques. Let's examine each approach:
Booming
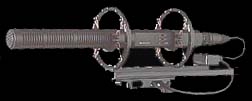
Booming involves attaching the microphone to a pole, called a boompole, and suspending it in front of the subject. This techniques allows for considerable movement by actors. Professional boompoles should extend at least 12 feet. Some extend as far as 18 feet. It is crucial that the boompole be lightweight, yet strong enough so that it doesn't bow under the weight of the mic.
Boompoles - 1.5' to 12'
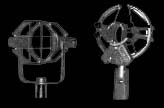
(Gitzo)The mic is attached to the boompole using a shock mount that suspends the mic in a rubber band-like webbing. This prevents vibration from traveling up the boompole to the mic.
Universal Shock Mounts
(Audio Technica)
Hi-End Shock Mount
(Rycote)Booming is done by a boom operator. The process is exacting since it involves juggling many variables at once, such as holding the mic as close as possible to the subject, moving the mic from one subject to the next, and keeping the mic out of the picture frame. To facilitate this, the boom operate must be equipped with headphones so that he can hear the sound. Rehearsals are also helpful when blocking is complicated.
The rule of thumb when booming is to get as close as possible to the subject, which is just outside the camera frame line. The further the mic is away from subject, the greater the background noise and echo, so every inch closer improves sound quality. The mic is normally positioned several inches to a foot over the actor's head. Up to two feet may be acceptable depending on the situation. The camera operator will help you determine how close you can position the mic without passing the frame line.
The rule of thumb when booming is to get as close as possible to the subject-- right outside the camera frame is ideal.
Booming can be done from overhead or underneath the subject:
Booming from Overhead - In overhead booming the mic is suspended above and slightly ahead of the subject. Overhead booming is the most favored technique since, in most situations, it provides the most natural sounding dialogue with the least amount of mixing.
Overhead booming allows multiple actors to be recorded with a single mic, yielding a pleasant blend. Sufficient sound effects are picked up to give the soundtrack a full texture. Perspective is easier to maintain, too. Since faces are closest to the mic, dialogue dominates sound effects. On wider shots, the mic tends to be higher resulting in thinner, more distant sounding dialogue. On closer shots, the mic is closer, resulting in greater presence.
With all of these benefits, it easy to see why overhead booming is the first preference in the hierarchy of microphone placement. Because of physical obstructions, this technique is not always possible to apply. The next favored option is booming from underneath.
Booming from Underneath - When booming from underneath, the mic is suspended below and slightly ahead of the subject.
Booming from underneath has several drawbacks when compared to overhead booming. First, dialogue tends to be bassy because the mic picks up more sound emanating from the chest cavity. Second, the mic is closer to the actor's hands so sound effects may appear louder than dialogue, throwing perspective off. Third, booming from underneath can be tricky on sets tight with furniture and actors.
Despite these drawbacks, booming from underneath can be an alternative to overhead booming and provide perfectly acceptable sound under the right conditions.
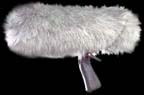
Pistol Grip
A pistol grip is used in tight spaces where a boompole is impractical. Since your arm acts like a boompole, the mechanics are essentially the same as booming. Most shock mounts can be switched between boompole and pistol grip with a minimum of fuss.
Pistol GripPlant
A plant is any microphone fixed in place. It is used to cover a static subject when it is impractical to use a boom. Plants can be conventional condenser mics or lavalieres (discussed below). The type of microphone used depends on the situation.
Placement is important because plant mics are effective only if dialogue is directed within their pickup pattern and range. Another important consideration is that the mic be properly hidden (planted). Mics can be hidden just about anywhere: behind, on top, and below props, furniture, and walls. The possibilities are limited only by your imagination. The newer lavs are so small that they can be used in plain sight and go unrecognized as a mic.
It is still important to use shock mounts to protect against vibration. For lavs, a small loop of tape can be used as a makeshift shock mount.
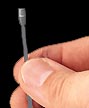
Lavaliere
The next approach in the mic hierarchy is the lavaliere. Lavalieres, called lavs for short, are tiny microphones worn on the actor's body, either inside or outside the clothing.
LavaliereLavs are given less preference than booming because they are prone to problems with perspective and contact noise:
Perspective - Since lavs are attached directly to actors' bodies, their voices dominate the soundtrack. Consequently, actors always sounding close to the camera, even in long shots. In addition, the track is devoid of sound effects and ambience. Overall, lavs result in sterile, less natural audio.
There are two ways to improve lav perspective. First, the lav can be moved further down the actor's chest. This opens up the air space and allows the mic to pickup more ambience. Second, a supplemental boom mic can be used to capture ambience and sound effects that the lav might ignore, such as footsteps.
Contact Noise - When rigging lavs on actors, contact noise occurs when clothing rubs over the mic head or cable. To avoid contact noise, clothing must be secured on all sides of the mic head. This best way to do this is to sandwich the lav head between two triangular wads of cloth tape, such as camera or gaffer tape. The wads are created by folding them like a flag, sticky side out.
Making a "Sticking Wad"In addition, tape or pin down any loose flaps and soften stiff areas of clothing with some water. Another way to avoid clothing noise is to attach lavs to non-traditional areas, such as hat brims and props.
Noise from the lav wire can be prevented by taping a few lengths of cable to the clothing. Double sided tape or sticky wads prevent the clothing from rubbing on the actor's body. A loop should be formed near the mic to provide strain relief.
Camera Mounted Mic
Mounting the microphone on the camera is a last resort measure! It violates the rule of getting the microphone as close to the subject as possible (i.e., just outside the frame). The sound is subject to excessive background noise and even vibration from the camera. Camera mounting should only be used when you work solo. If another person is available, use a pistol grip.
Wired vs. Wireless Mics
Wireless (radio) mics send the audio signal over the airwaves using a transmitter and receiver. Their main drawback is that they are subject to RF interference, so a wired mic should be used whenever possible. Wireless mics are helpful when the boom operator cannot get close to the action and it is impractical to run a lav cable.
Single vs. Multiple Mics
A good rule of thumb is that each mic should do as much work as possible. On smaller sets where actors are a few feet apart, one mic will suffice. On larger sets where actors are further apart, additional mics may be required.
Each mic should do as much work as possible.
Multiple mics can interfere with each other when positioned too closely together. This is called phasing and it's discussed in the next lesson.
One of 300 lessons found in Film School Online!
If you are interested in learning more about the movies used in this
lesson, click on the title or picture (courtesy 20th Century Fox,
MCA/Universal, Paramount, TCM, and Warner Brothers).Copyright © Film School Online!