![]()
SPLICING: THE BUSINESS SIDE OF FILM EDITING
Film splicing is the technique of physically joining pieces of movie film together (not to be confused with the creative process of film editing). Both negative and positive print film can be spliced. The bond is made using a machine called, appropriately enough, a splicer.
There are three types of splicers available. Each is designed for specific applications and film stocks. It's important to choose the one that is suitable for your situation:
Tape Splicers
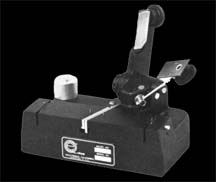
Tape splicers join film using clear tape. They are versatile because they work with all types of film--Mylar, acetate, and polyester. The tape can be perforated or non-perforated. When using non-perforated tape, the machine punches out the perf holes as it makes the splice.
Rivas Tape SplicerNon-perforated tape is less expensive. The drawback is that the holes don't punch out cleanly when the blade gets dull. The machine also creates a lot of tape debris from the punches, which can attach itself to the film.
The trick to making a proper tape splice is to firmly press down on the tape to activate the glue. Many editors do this with their fingernail, which also helps to remove air bubbles. Newbies often don't press the tape down and their splices come apart. The following clip shows how to make a proper tape splice:
Tape splices are not invisible so they cannot be used with negative film. On the other hand, they are perfect for splicing workprints because they can be easily taken apart to re-arrange shots. Theaters and collectors also use tape splices to repair release prints.
Tape splices "set" with time and become difficult to remove. Film cleaner can be used to loosen the tape and help clean away the remaining residue.
The main drawback of using tape splices is that they come apart when the film is soaked in film cleaner or conditioner. The splices must then be remade, which can be time consuming.
Cement Splicers
Cement splicers join pieces of film together using glue. The film is chemically melted (welded), forming an invisible permanent bond. Because of this, cement splicers are used with negative film in preparation for striking release prints.
Cement splices can be used to repair and restore release prints, as well. They should not be used on workprints because the splices are permanent and workprints go through constant changes.
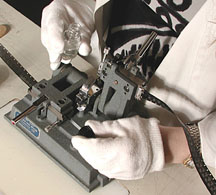
Professional cement splicers have heating elements that allow the glue to set faster. They are called hot splicers.
Cement Hot SplicerOne drawback of using a cement splicer with 16mm is that a frame is lost in the process of making a splice. Generally, this doesn't create a problem because one frame equals 1/24 of a second and persistence of vision usually prevents detection. This is not an issue with 35mm film because the splice is made completely on the frame line.
Another drawback is that cement splicers where designed for acetate film. They will not work with Mylar and polyester based films.
The key to making a successful cement splice is to scrape all of the emulsion from the base to expose the acetate. If you don't do this, the splice will be weak and eventually come apart. Emulsion only appears on one side of the base, so there is no need to scrape the opposing piece of film.
It's important to work with fresh cement, too, or you will have equally poor results. You can tell if cement is fresh by visually inspecting it. If it looks yellow or cloudy, it should be replaced.
Ultrasonic Splicers
Ultrasonic splicers are used with Mylar and polyester base film stocks. They are electronic and work by fusing the two pieces of film together. -Lou LaVolpe
Copyright © Film School Online!